EDITING OPTIONS
4.3
Video-Editor
This chapter explains how to edit your video. If you would like to add PowerPoint presentations or a quiz to your video, or if you would like to edit the video, you will find the instructions here.
Move the cursor over your video to select the desired editing option:
 A new window will open. On the left, you will see the edit menu. We will go into more detail about Slides, Quizzes, Cuts and Clips.
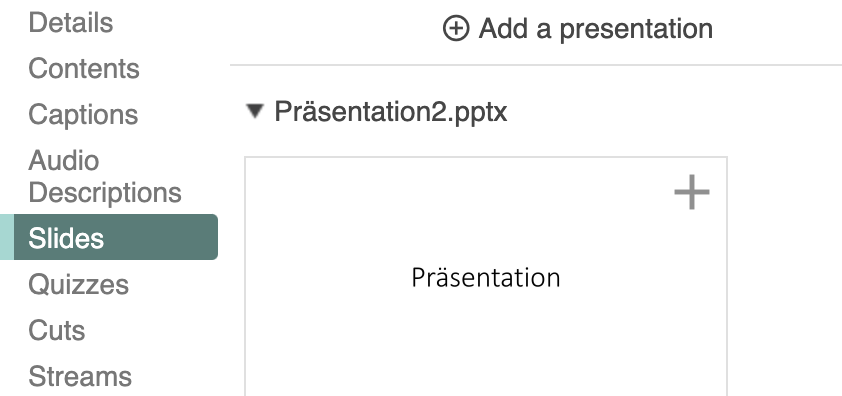
A. Slides
If you would like to provide users of a video with an associated presentation, you can do so in the edit menu under “Slides”. As already explained in the Settings chapter, you can upload your presentation as a PDF via “Settings” > “Streams”. Or you can upload a PowerPoint file here via “Slides” > “Add presentation”. It will take a moment for the presentation to be processed. You will then be able to see it.
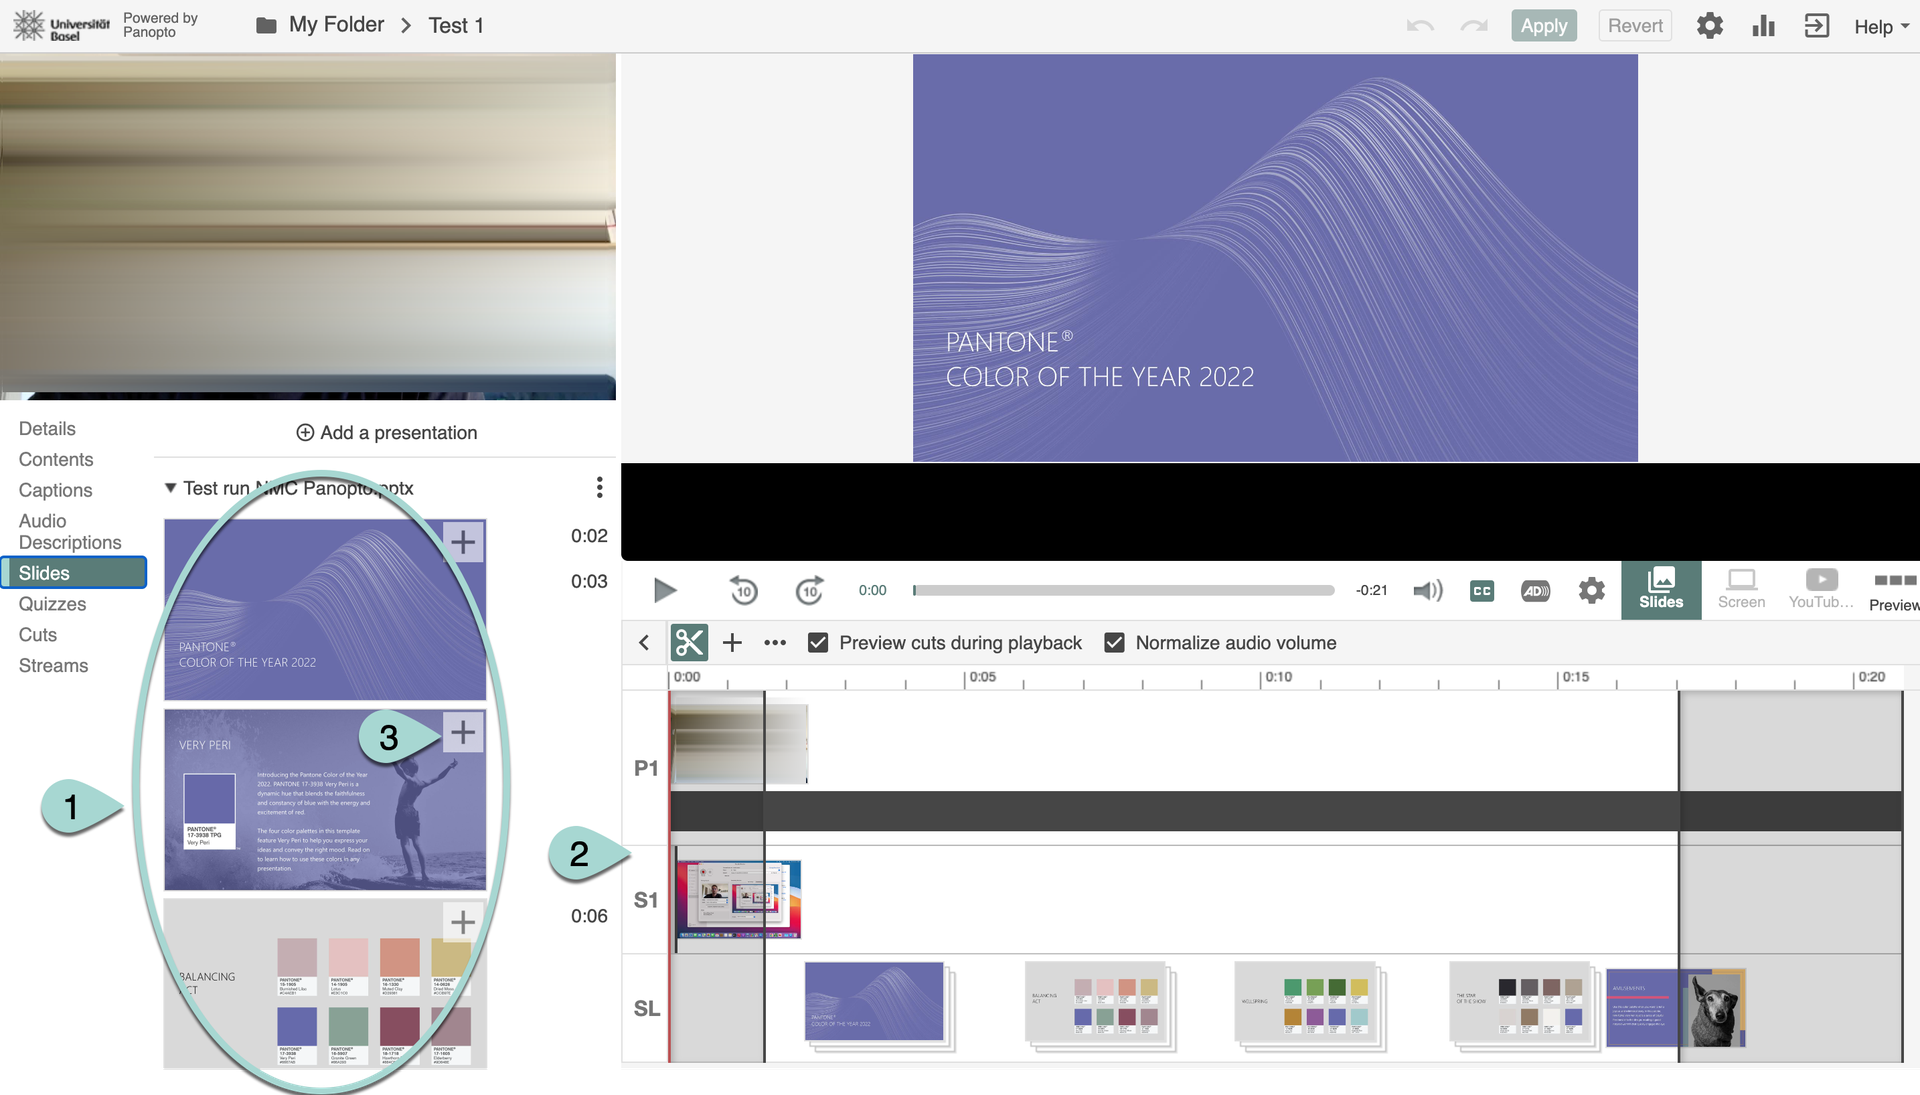
1. Assignment of individual slides to the video
You will find the slides of the presentation (1) listed individually. To make the whole thing clearer, you can assign the slides to exact times in the video. To do this, go to the desired position in the timeline (2) and then click on the plus (+) symbol (3) next to the correct slide.
If you would like to make the presentation available for download, you can do so very easily. Return to the menu. Click on Settings (1) > Streams (2) and tick the Allow (3) checkbox.


Quizzes
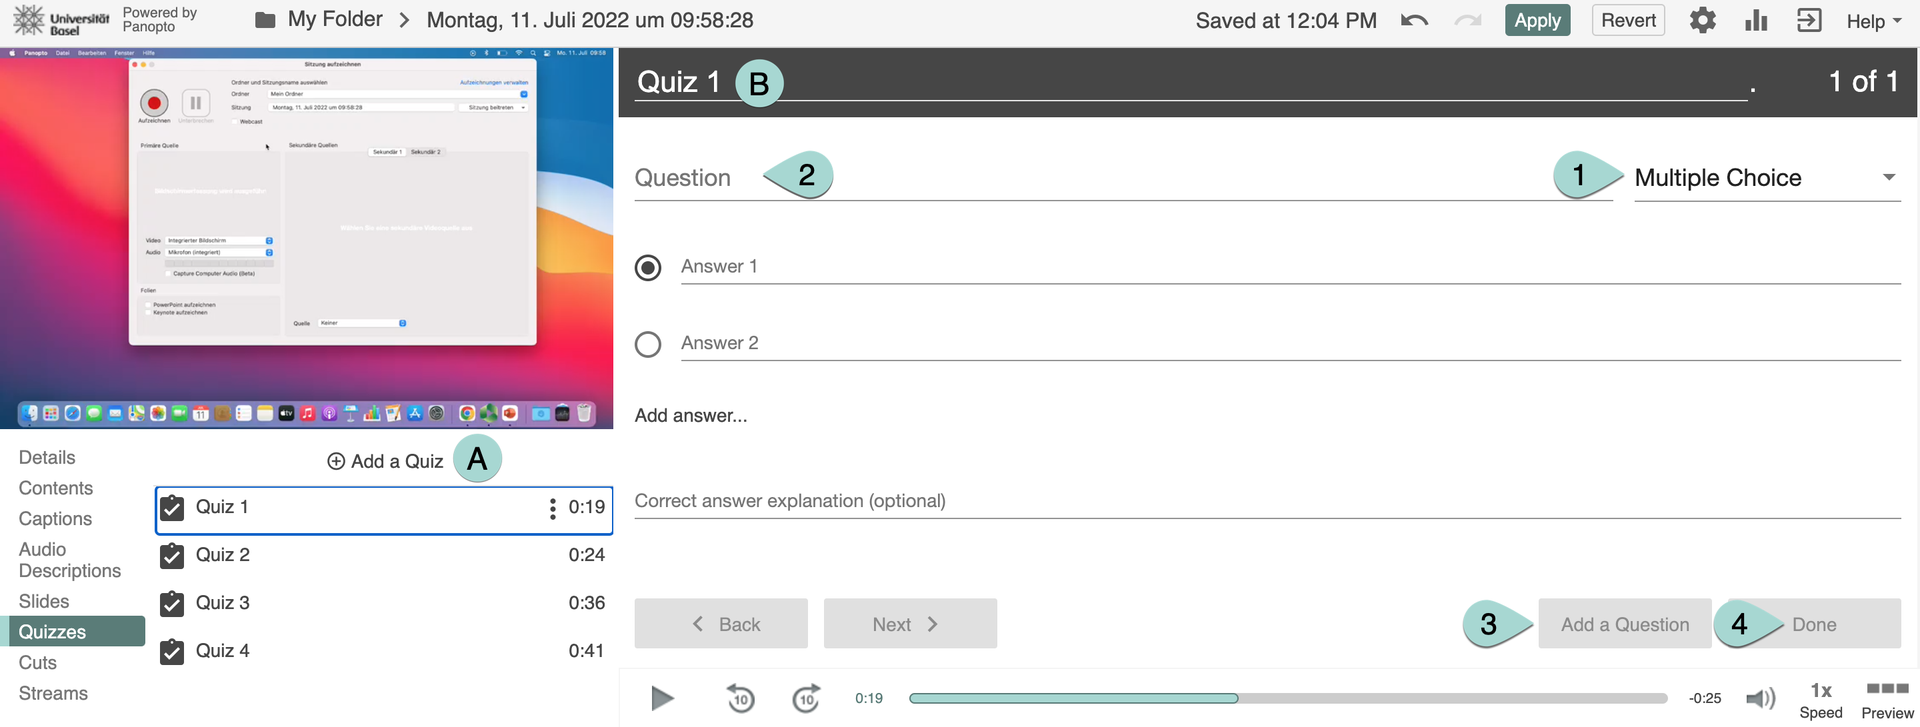
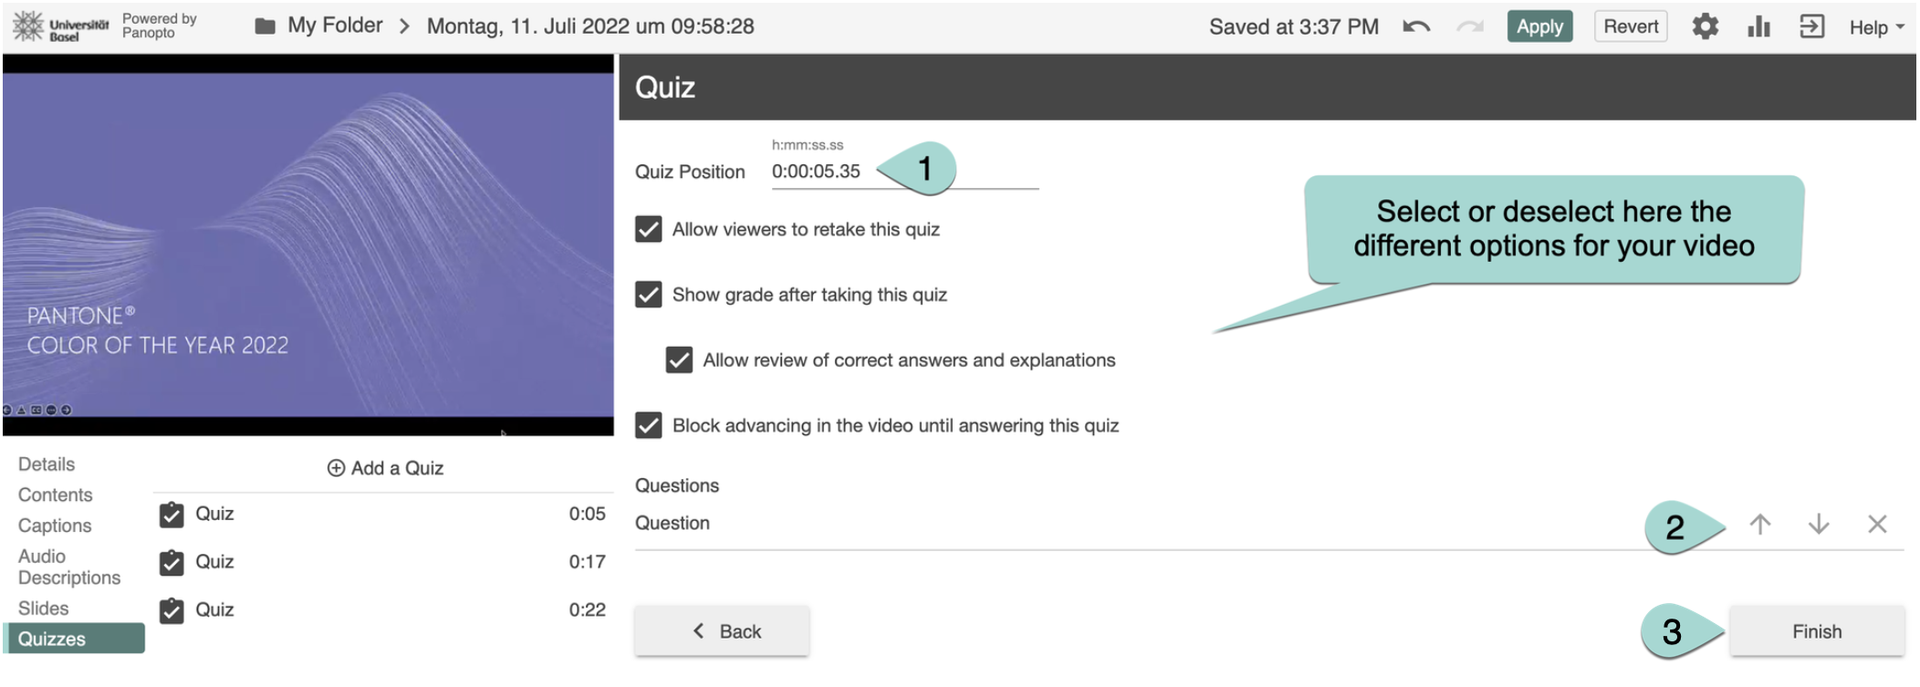
You also have the option of adding one or more quizzes to your video. Click on Quizzes in the edit menu on the left and then click on Add a Quiz (A). You now have the option to give the quiz a name (B) (this is particularly useful if you plan to include several quizzes in your video). You can then choose between different (1) question types (you can choose between True/False, Multiple Choice and Fill in Gaps). Then enter your (2) question(s) and the corresponding answer(s). If you want to add more questions, click on (3) Add a question. If you want to finish the quiz, click on (4) Done.
There are other (optional) settings you can use for your video. Determine the (1) position (= point in time in the video) where the quiz should appear. Should the quiz be completed between chapters or at the end of a lecture? Also select the (2) order in which the questions should appear and tick the options you want (Repeat Quiz, Note, Block Continuation). Finally, click on (3) Finish.
B. Cuts
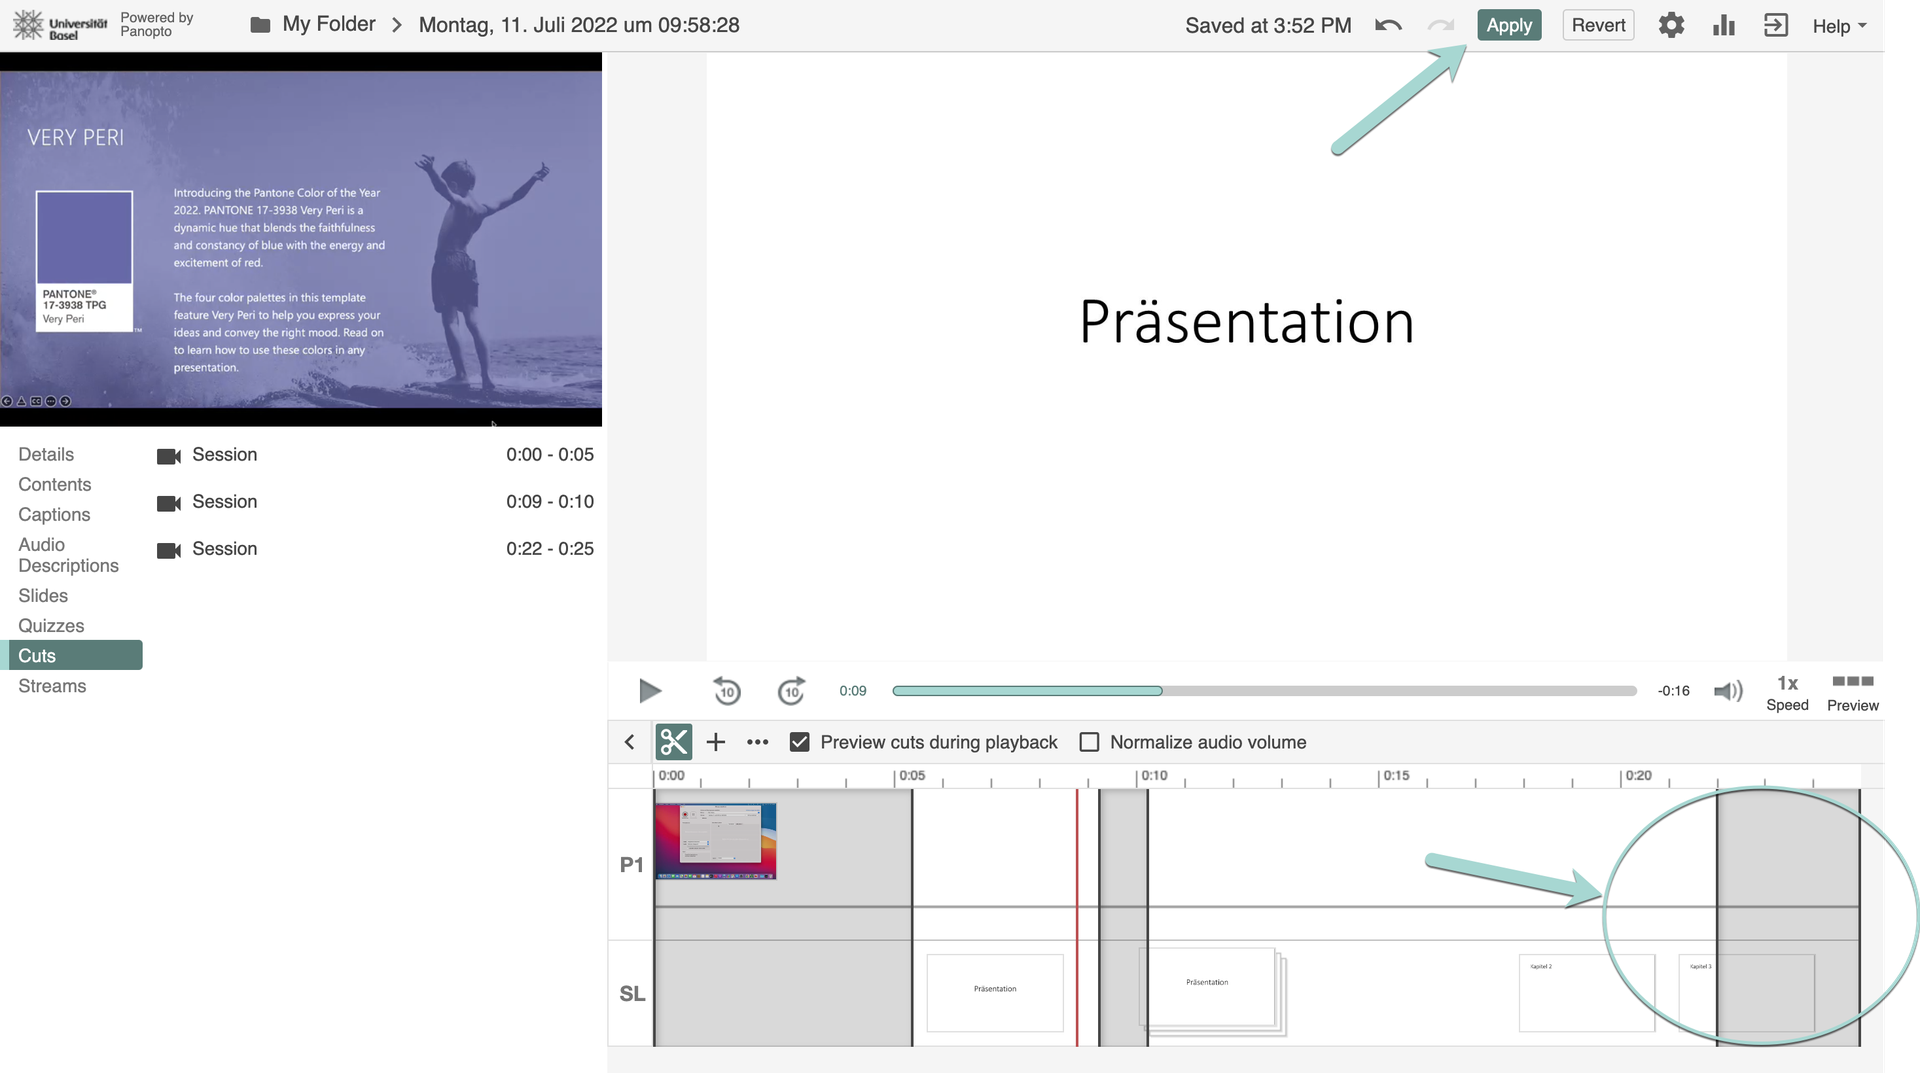
For videos that you have made yourself, it can be helpful to trim the beginning and the end of the video (and possibly also bits in between). This is very easy to do with Panopto. Click on “Cuts” in the edit menu. In the timeline below the video image, select the part you want to cut.
To do this, position the cursor over the point you would like to start the edit, click and drag to the right, and then let go at the point you want the cut to finish. This part will now appear grey in the timeline. To check the changes, tick the “Edit preview during playback” checkbox just above the timeline and click on “Play” (= triangle below the video image). If you are satisfied with the changes, click on “Apply” in the top right corner. It will take a moment for the changes to be processed.
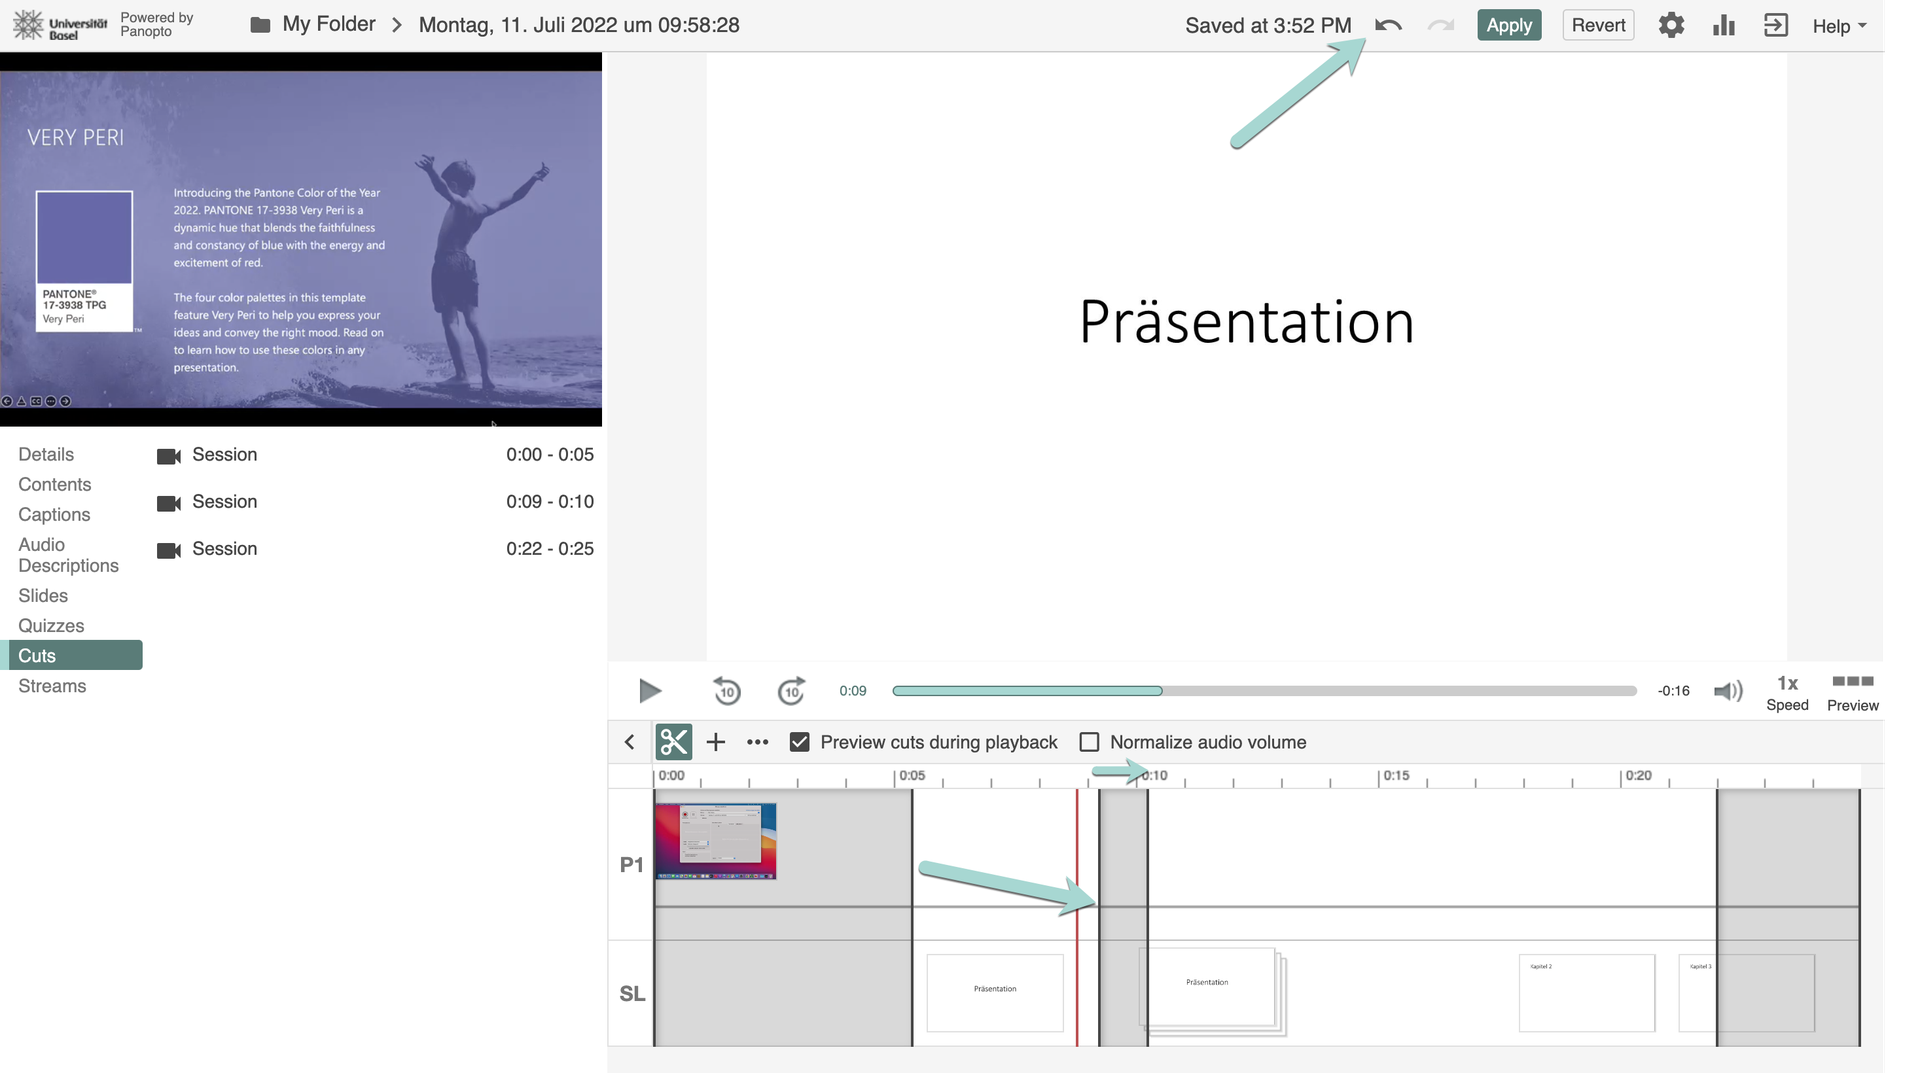
If you are not satisfied with the cuts, you can undo the changes (back arrow in the top bar). You can also delete the cuts manually. To do this, drag the edges of the grey area and reduce them so that they disappear again:
C. Clips
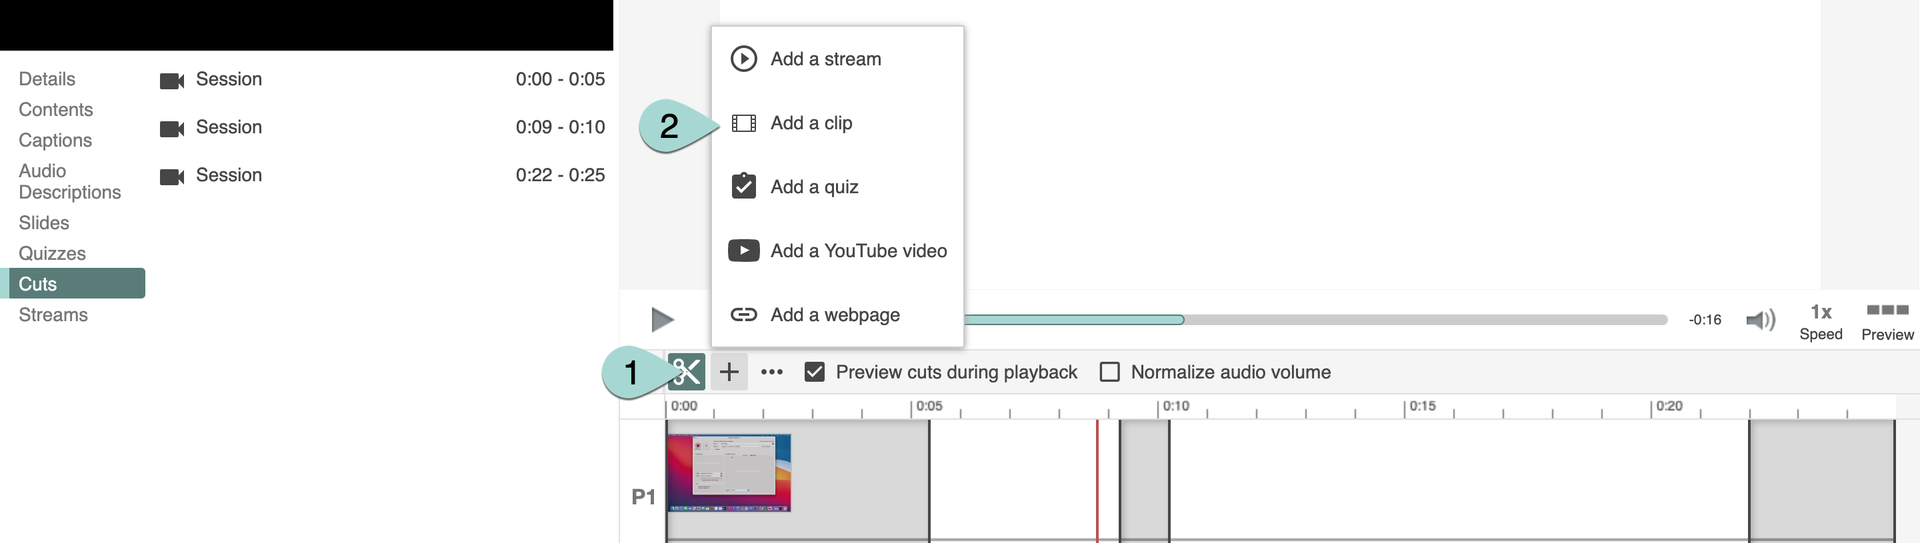
You can add your own clips to your recorded video. On the editor timeline, select where you want to add the clip and then select the ”+” icon (1) on the toolbar. In the pop-up menu that appears, select Add a Clip (2). You can change the location of the new clip within the timeline later on, but this is more time-consuming.
Clips are completed videos that you are now inserting as a whole. This means that you have to edit all the clips you want to insert before you insert them; you cannot edit them afterwards, within the timeline. You can only insert whole videos and not just parts of videos. These videos have to be available in Panopto (you cannot upload videos to Panopto in this step; you have upload them before this step).
This will open the window below:
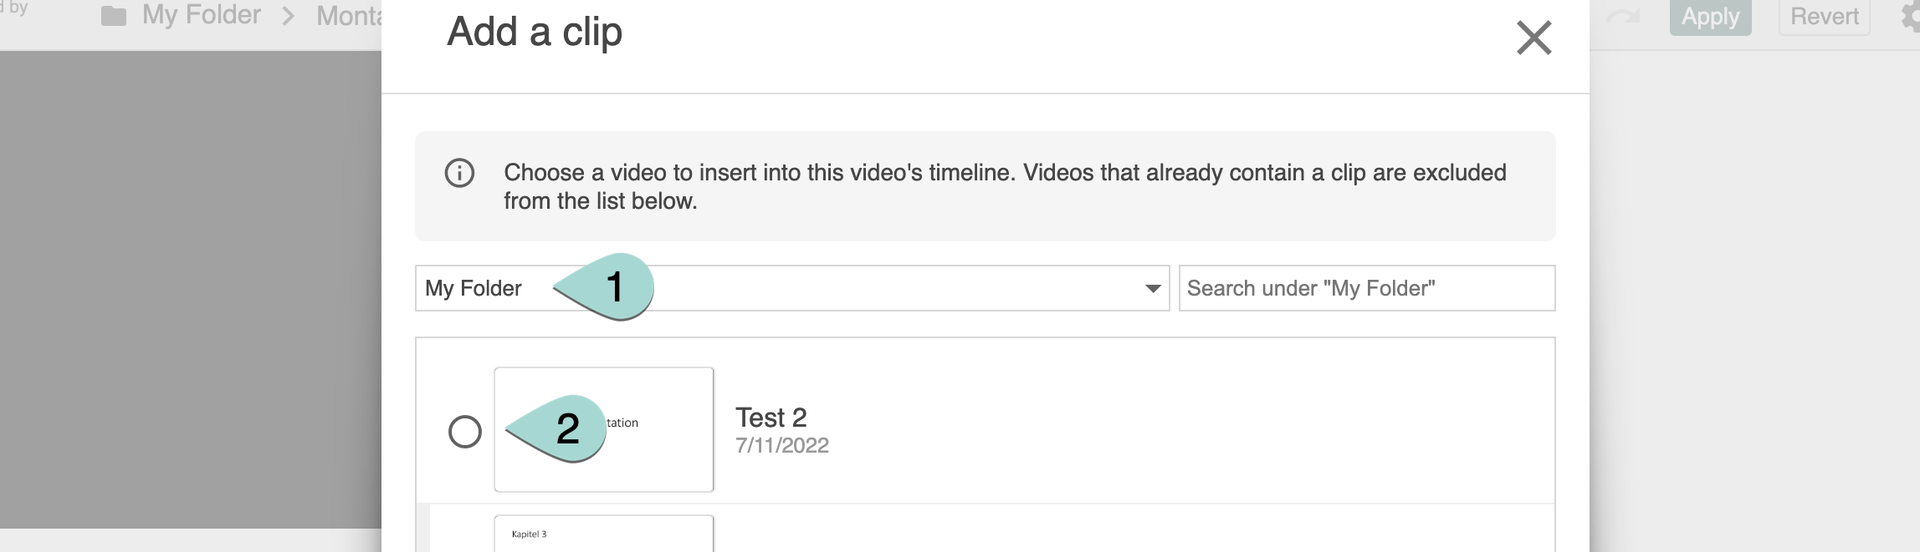

Select the folder (1) which contains your video clip. Then select the video (2) and click on Insert (3).
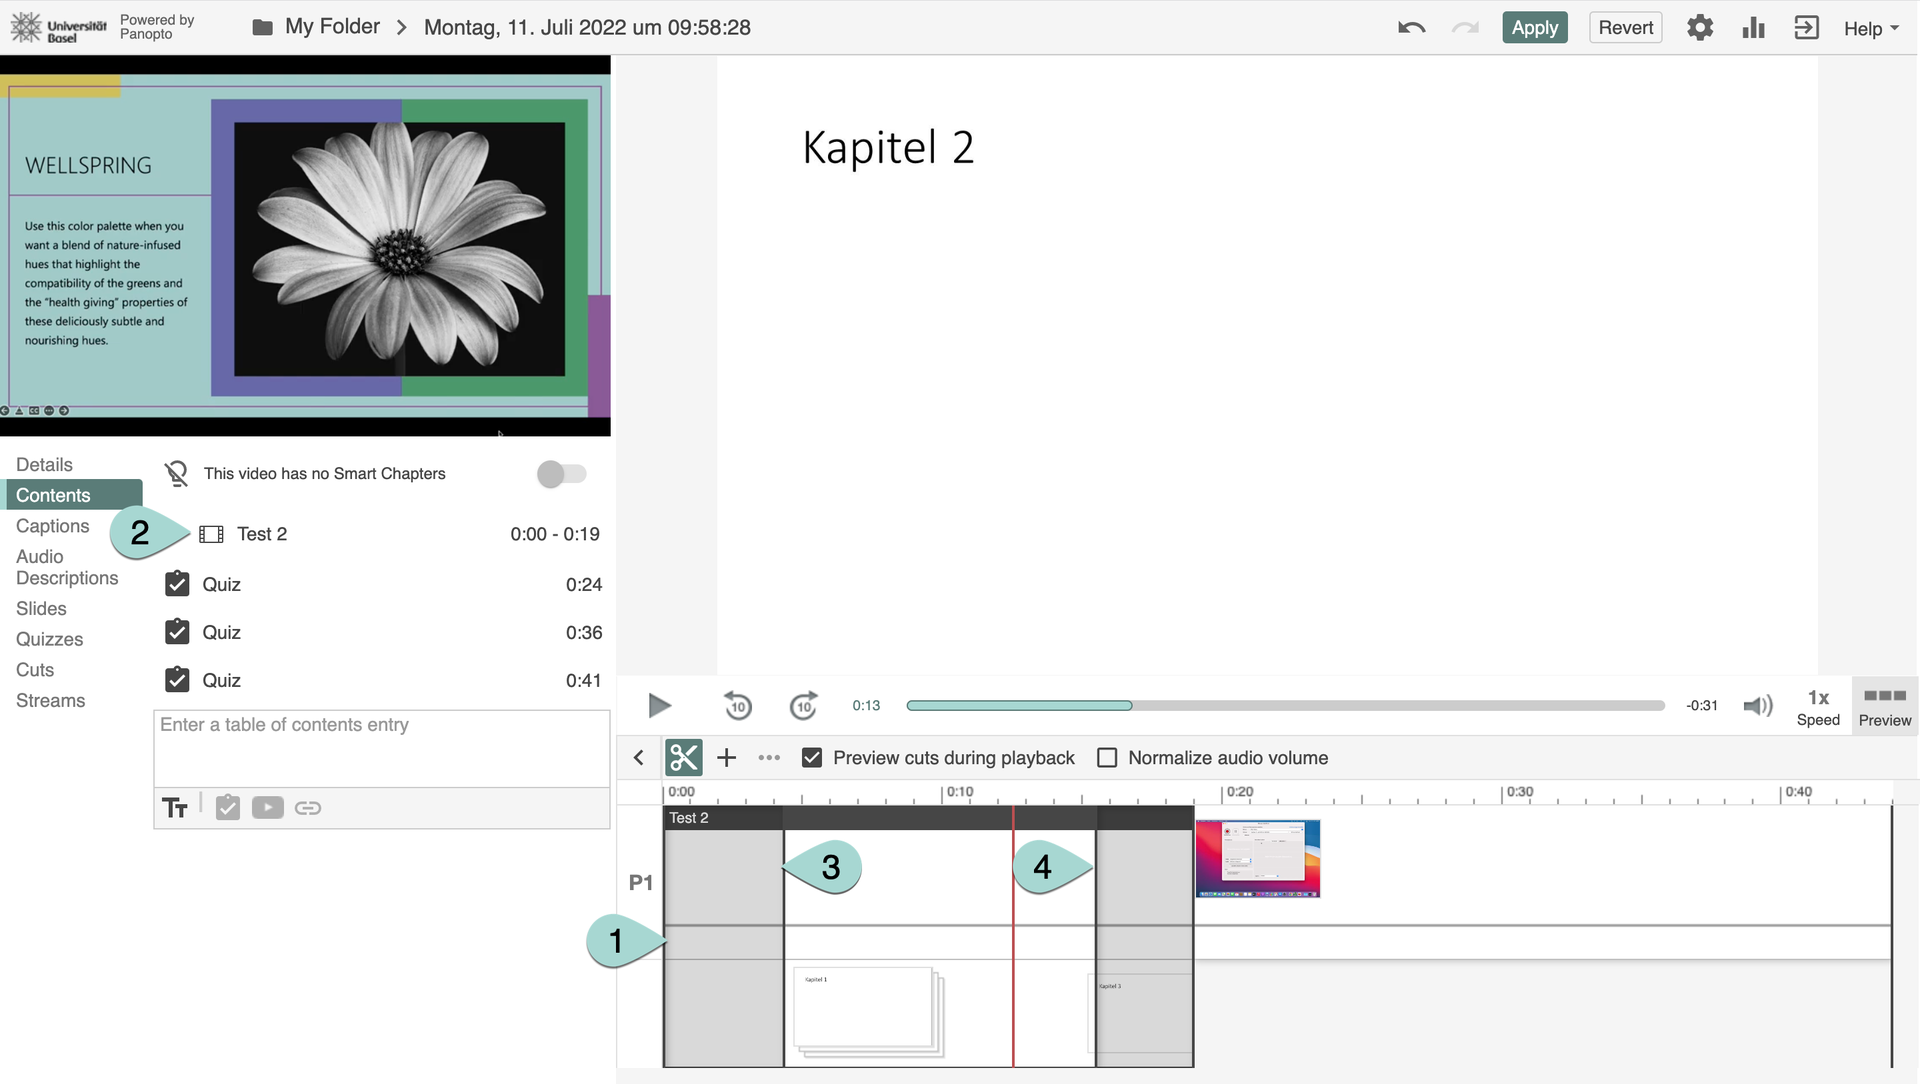
The clip will now appear in the timeline (1) at your predefined location (this can be in the middle of your timeline, for example). You will also find the clip listed in the Contents tab (2). Once the clip is inserted, you can only edit its beginning or end (3 and 4), but not its middle. If you want to edit the clip in the middle, you have to do this in the original clip before inserting it in the timeline.
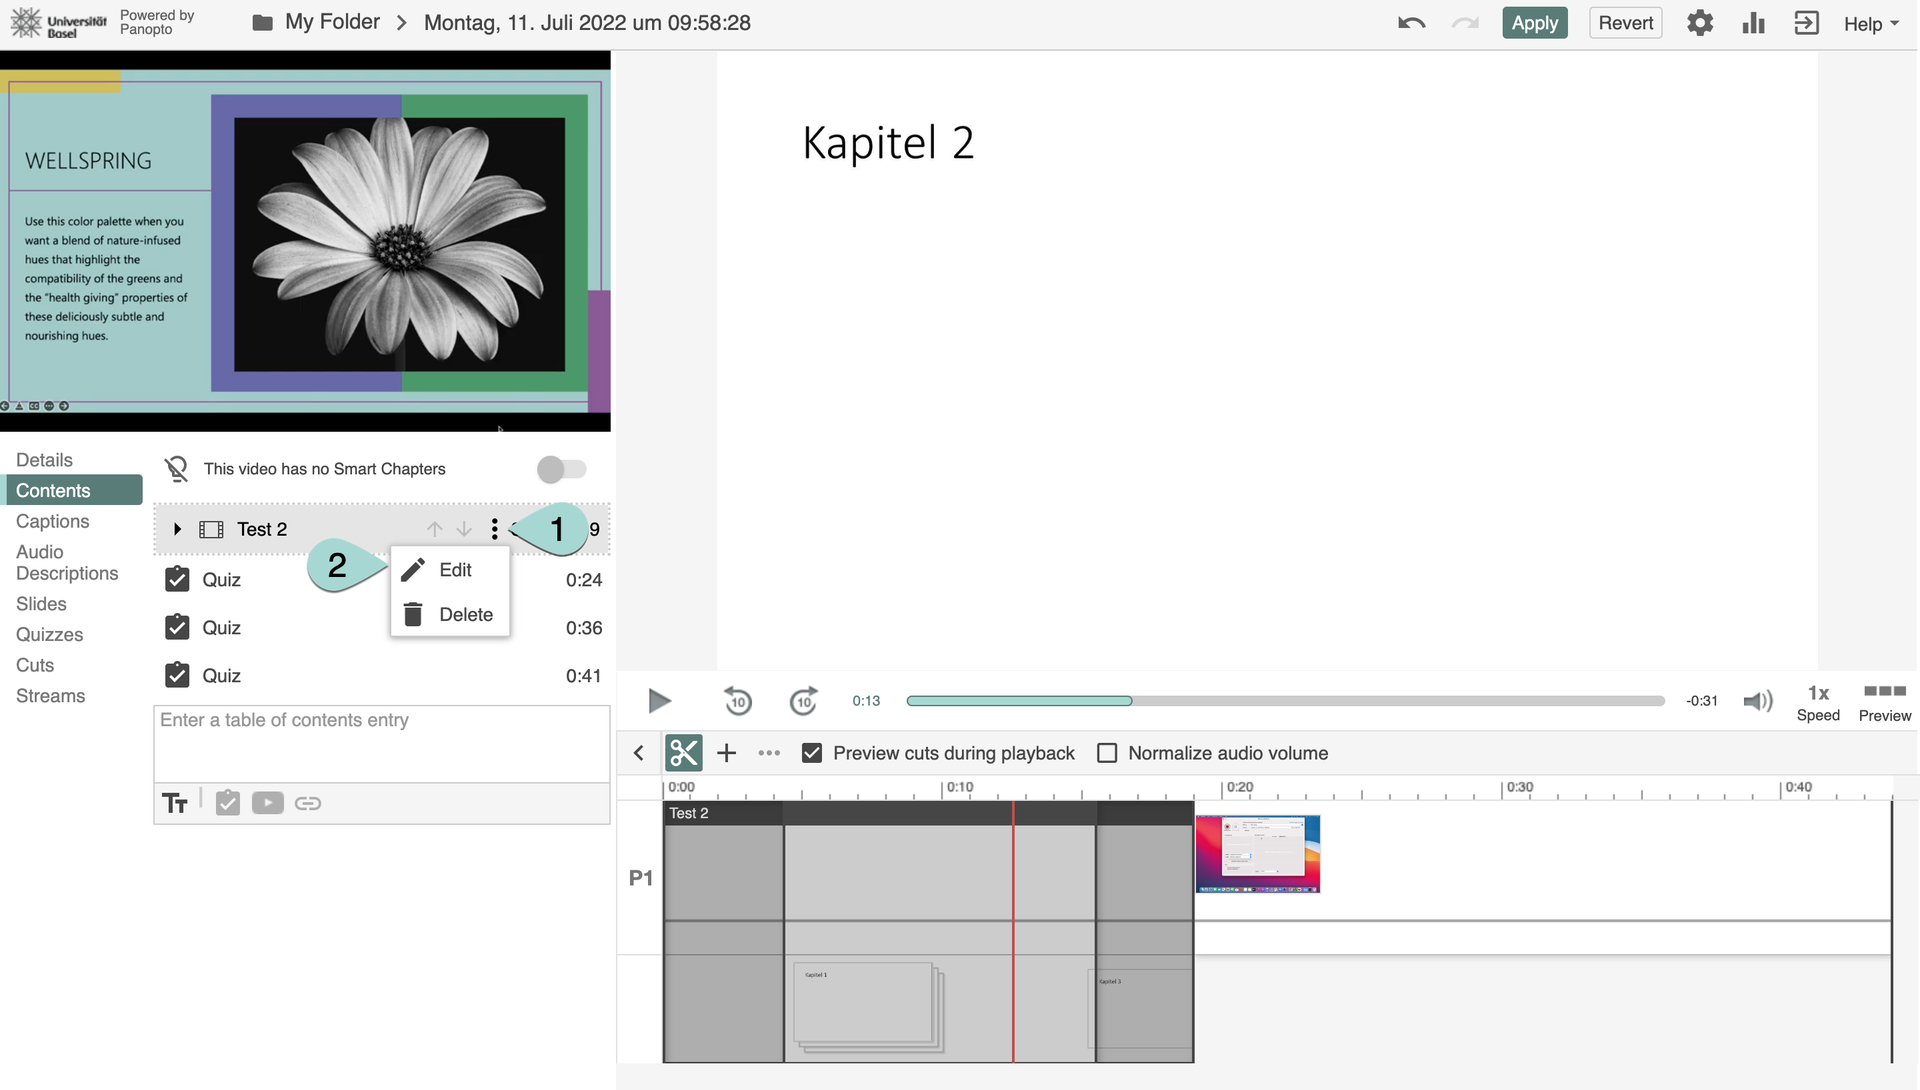
Editing the Clip Location: to change the location of your clip in the timeline, click on the three vertical dots to the right of the clip on the Contents tab (1). Click on Edit (2).
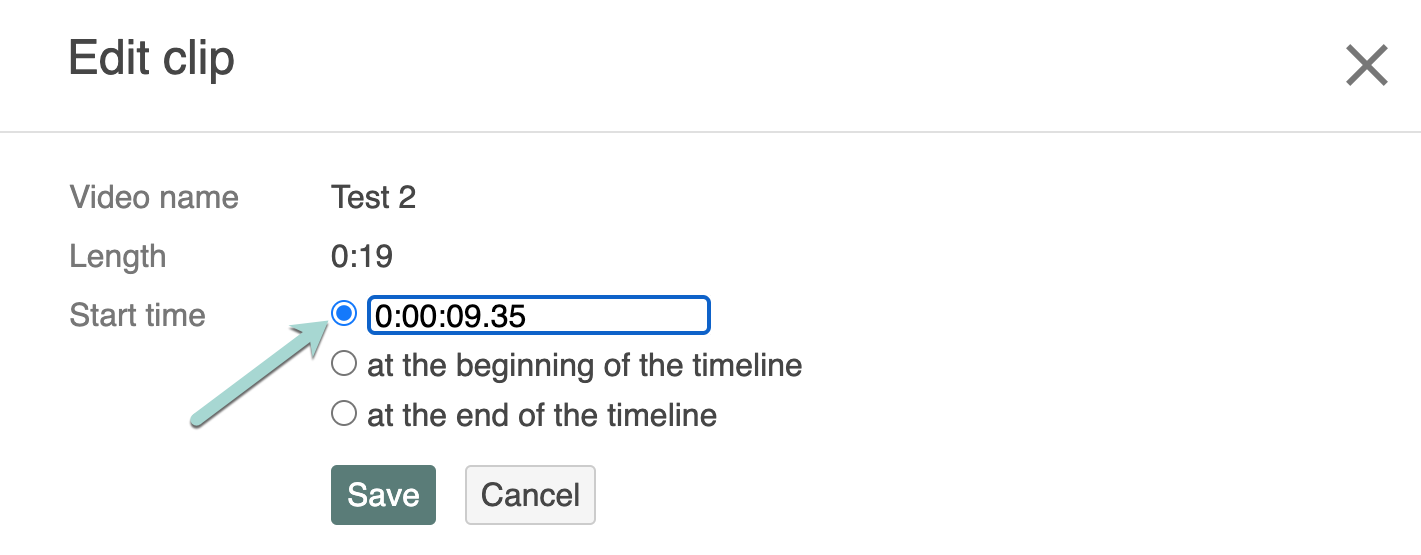
In the Edit clip window, you can now provide an exact Start time, or place the clip at the beginning of the timeline or at the end of the timeline. Note that the timeline now looks different because both videos are combined. Select Save when you are done.
D. Captions
1. Manually
You can add subtitles to your video manually so that students can watch your video without sound. To do this, go to the point in the timeline (1) where you want to insert the subtitles. Enter the subtitle here (2). From this point on, the subtitles are displayed until the next subtitle is entered (3). Once you have entered the subtitles, click on apply (4).
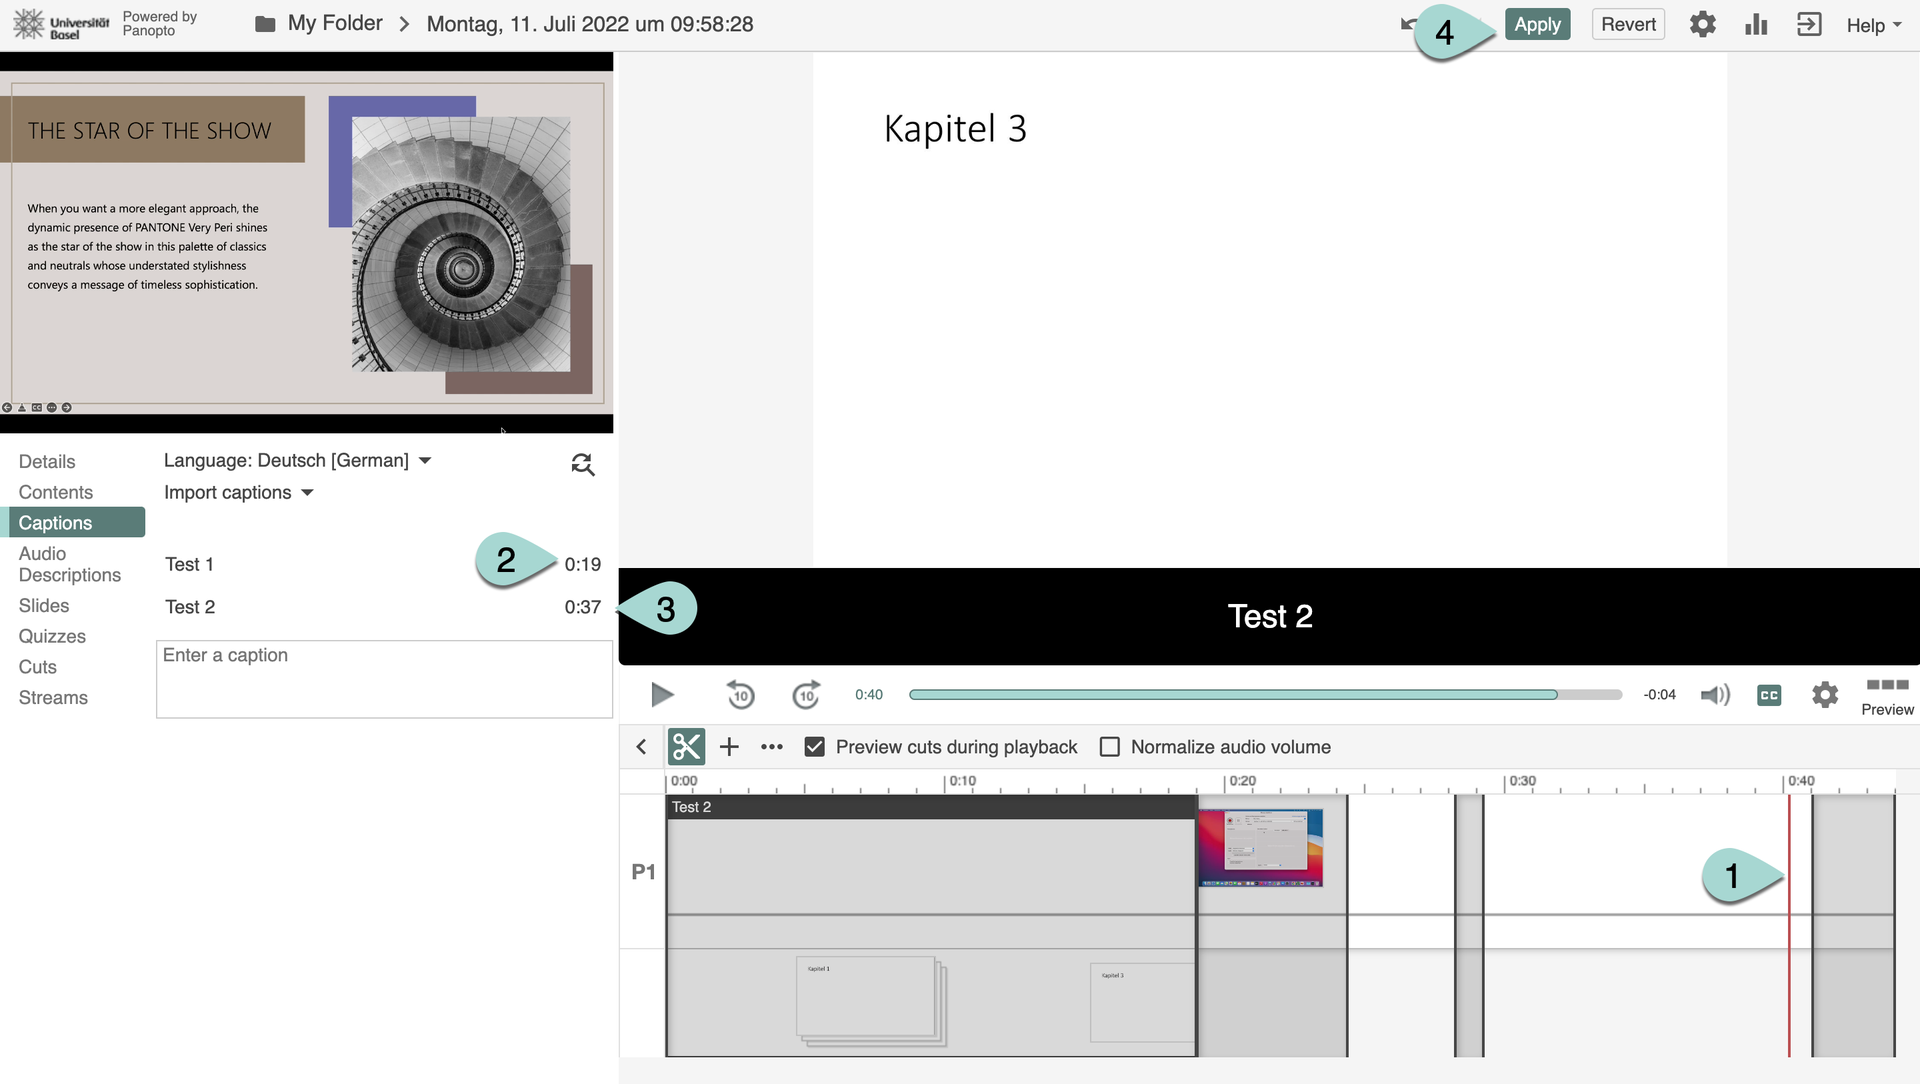
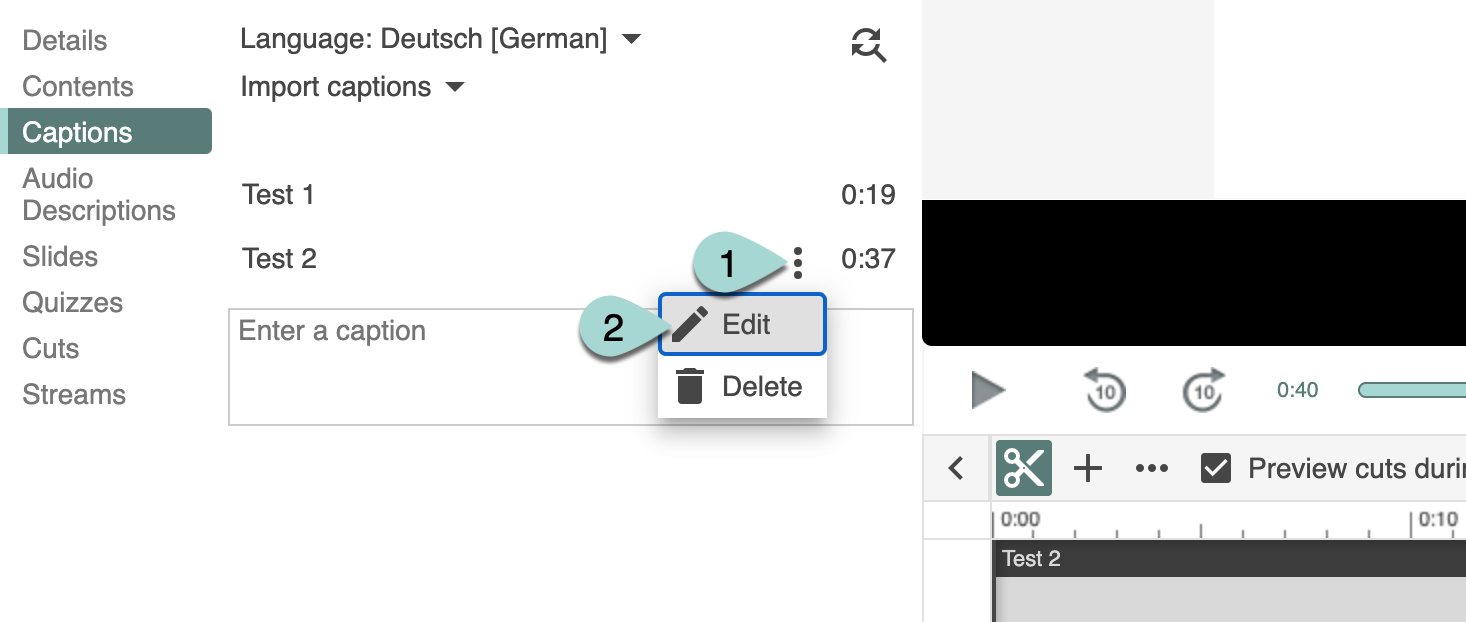
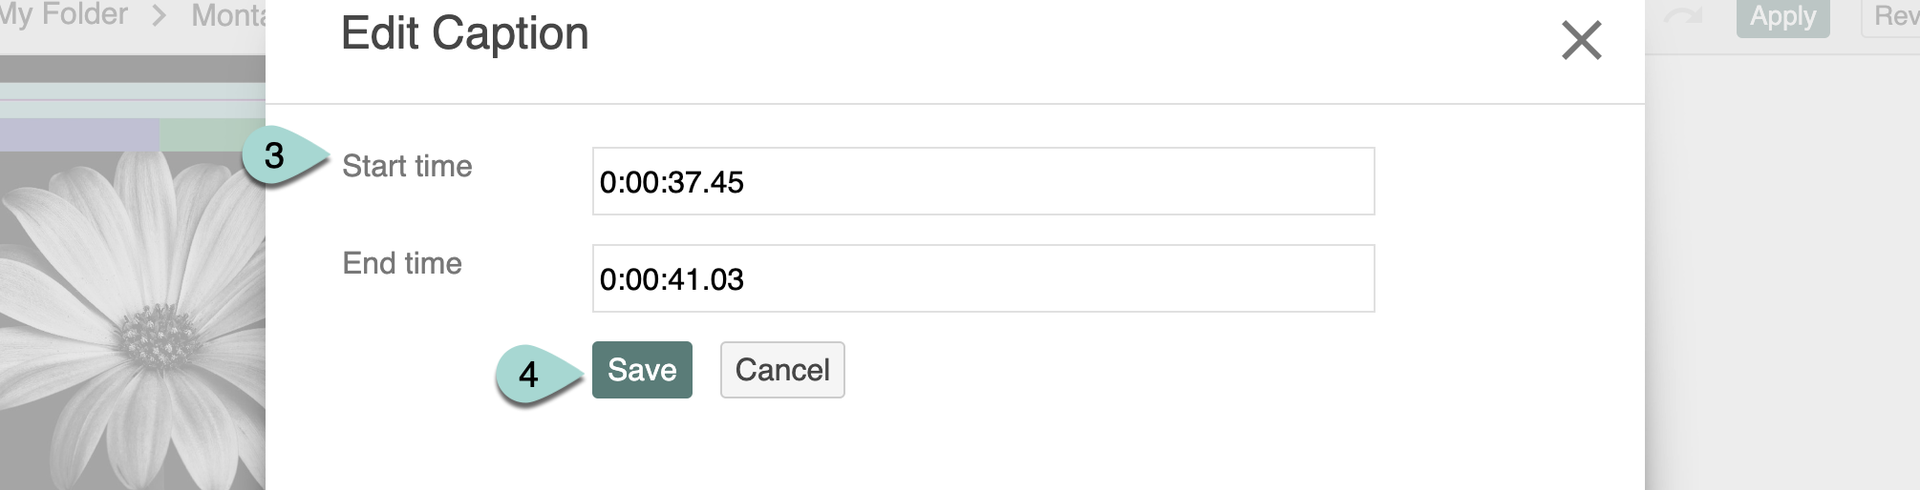
You can also change the time of the individual subtitles afterwards by clicking on the three dots (1) next to the subtitle and then on edit (2). A window will then open in which you can enter the desired time (3) and save (4).
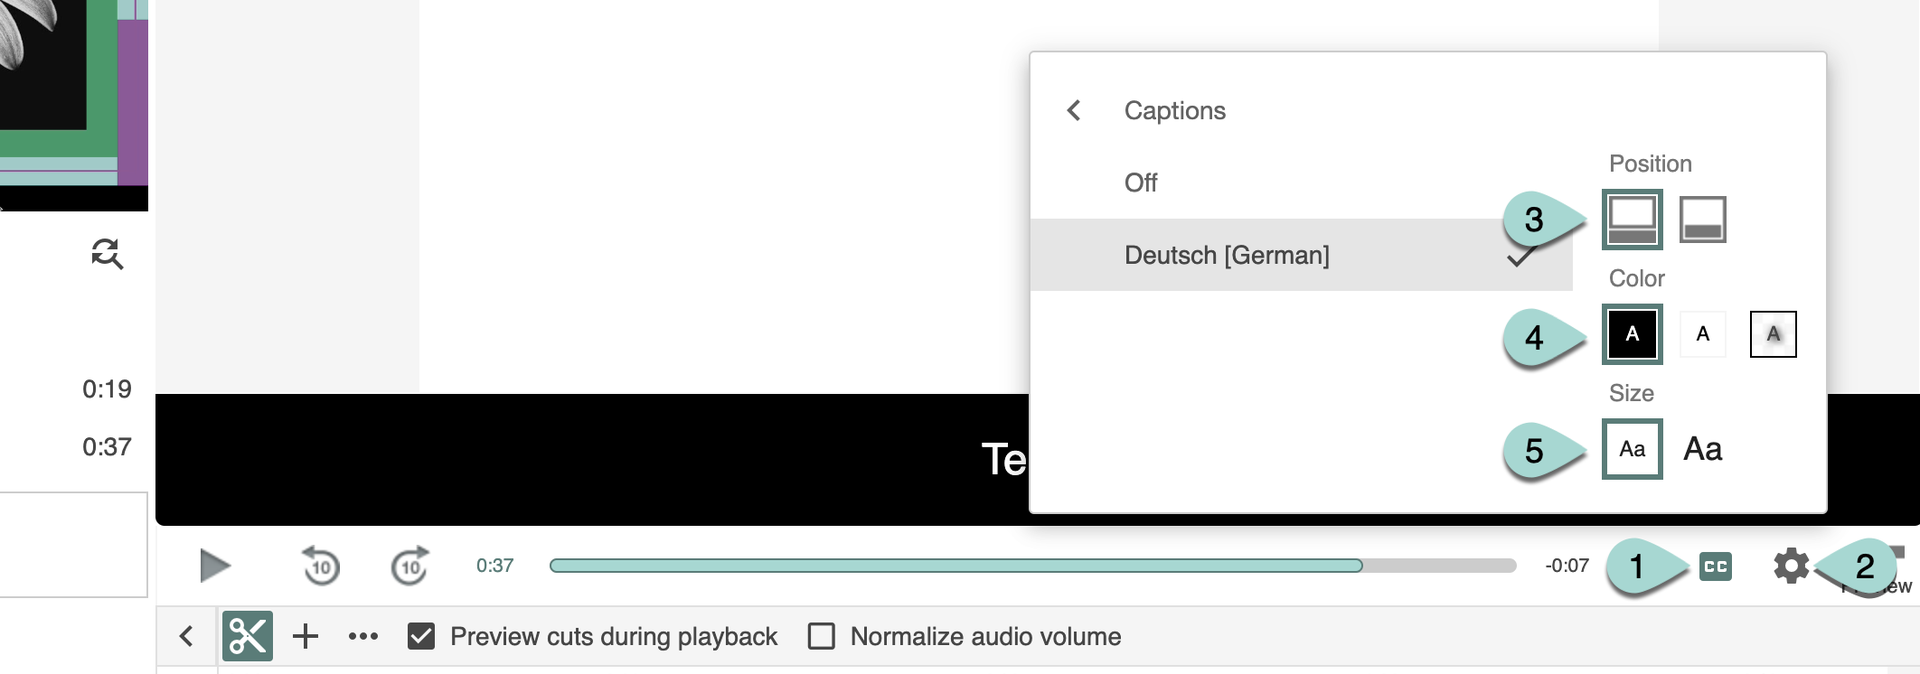
If you have entered all subtitles, you will not be able to see them yet. To make the subtitles visible, you must click on the “CC” symbol (1) under the video. Clicking on the cogwheel (2) you can choose from certain different display options: The position (3), i.e. whether you want the subtitles to be visible below or in the video, the color (4), i.e. whether you want black on white, white on black or light font without background, and the size (5) of the font.
2. Automatically
You can also have subtitles generated automatically. To do this, go to edit > captions and click on replace with automatic captions.
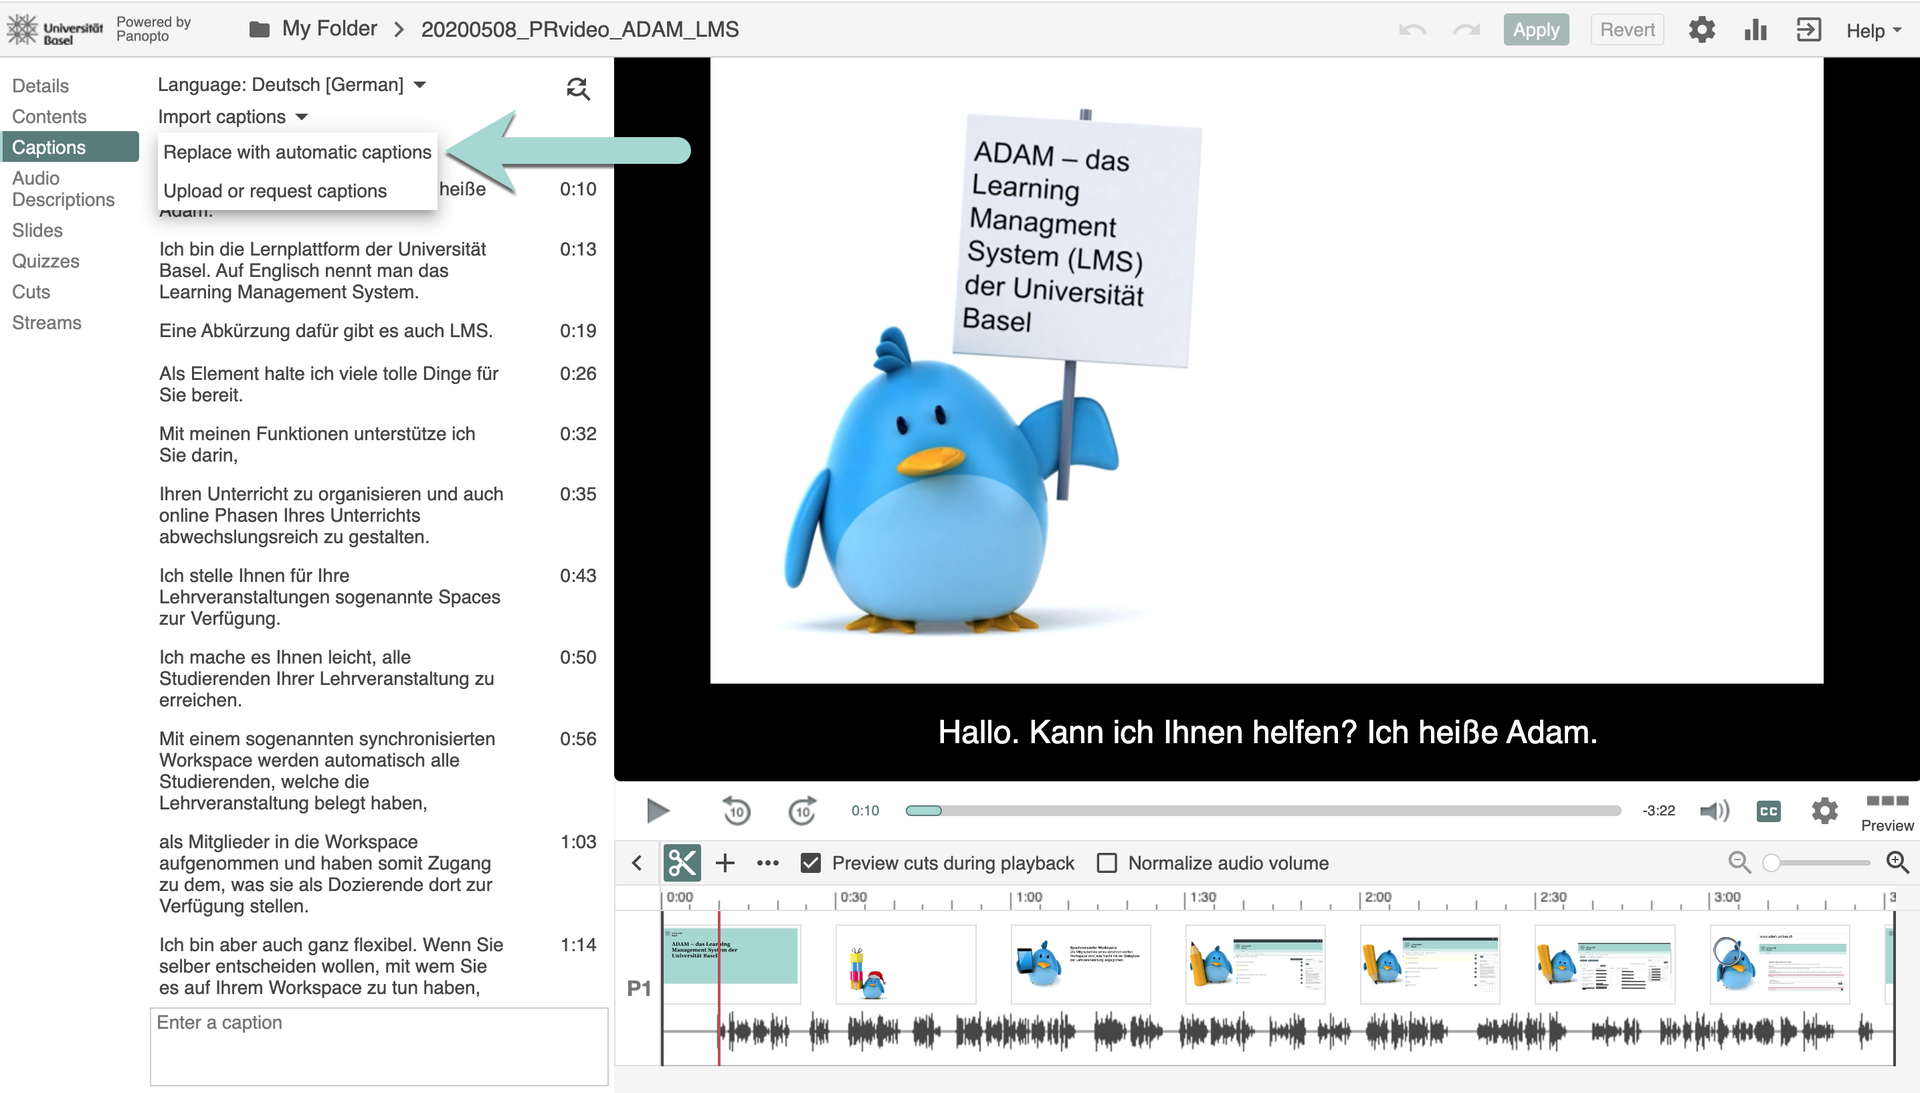
Important to know: if you have uploaded a video that is not in German but in English, for instance, then you need to pay attention to a few things: automatic subtitling only works if you set up a subfolder in your parent folder. This has its own language, so to speak, which must be set according to the desired subtitles.
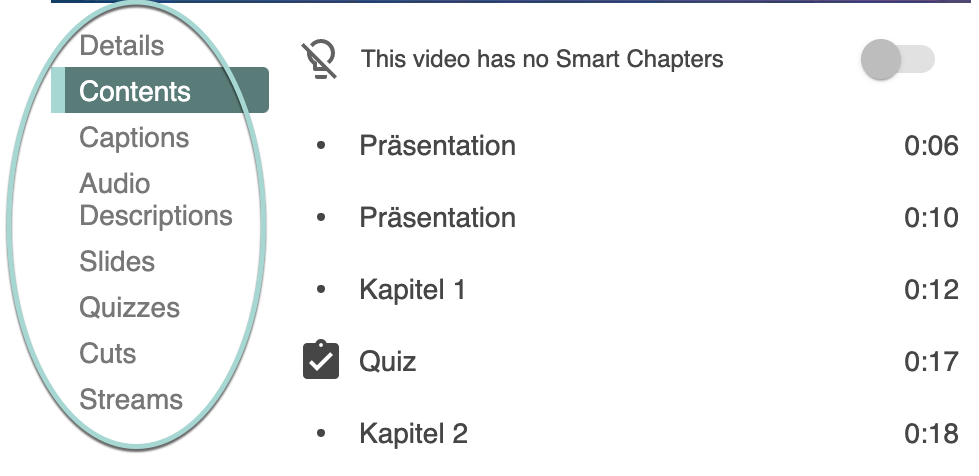
E. Contents
1. Insert chapters, quizzes, websites and YouTube videos
For a breakdown of the video, you can insert chapters and other fixed points in the video. This allows students and other viewers to go forward or back to a specific place and gain an overview.
You can find this function under content (1). Simply go to the point in the timeline (2) where the chapter begins and enter the name of the chapter (3). You can do this as often as you like. Enter the name of the chapter under the table of contents (4) and the chapter will automatically be inserted chronologically. If you have already inserted slides, you can also enter subsections. In addition to text (chapters), you can also insert quizzes, websites or YouTube videos. Here too, go to the desired location in the timeline and click on the corresponding icon (6). Please note that quizzes (5), websites or YouTube videos that have already been inserted will also appear in the table of contents.

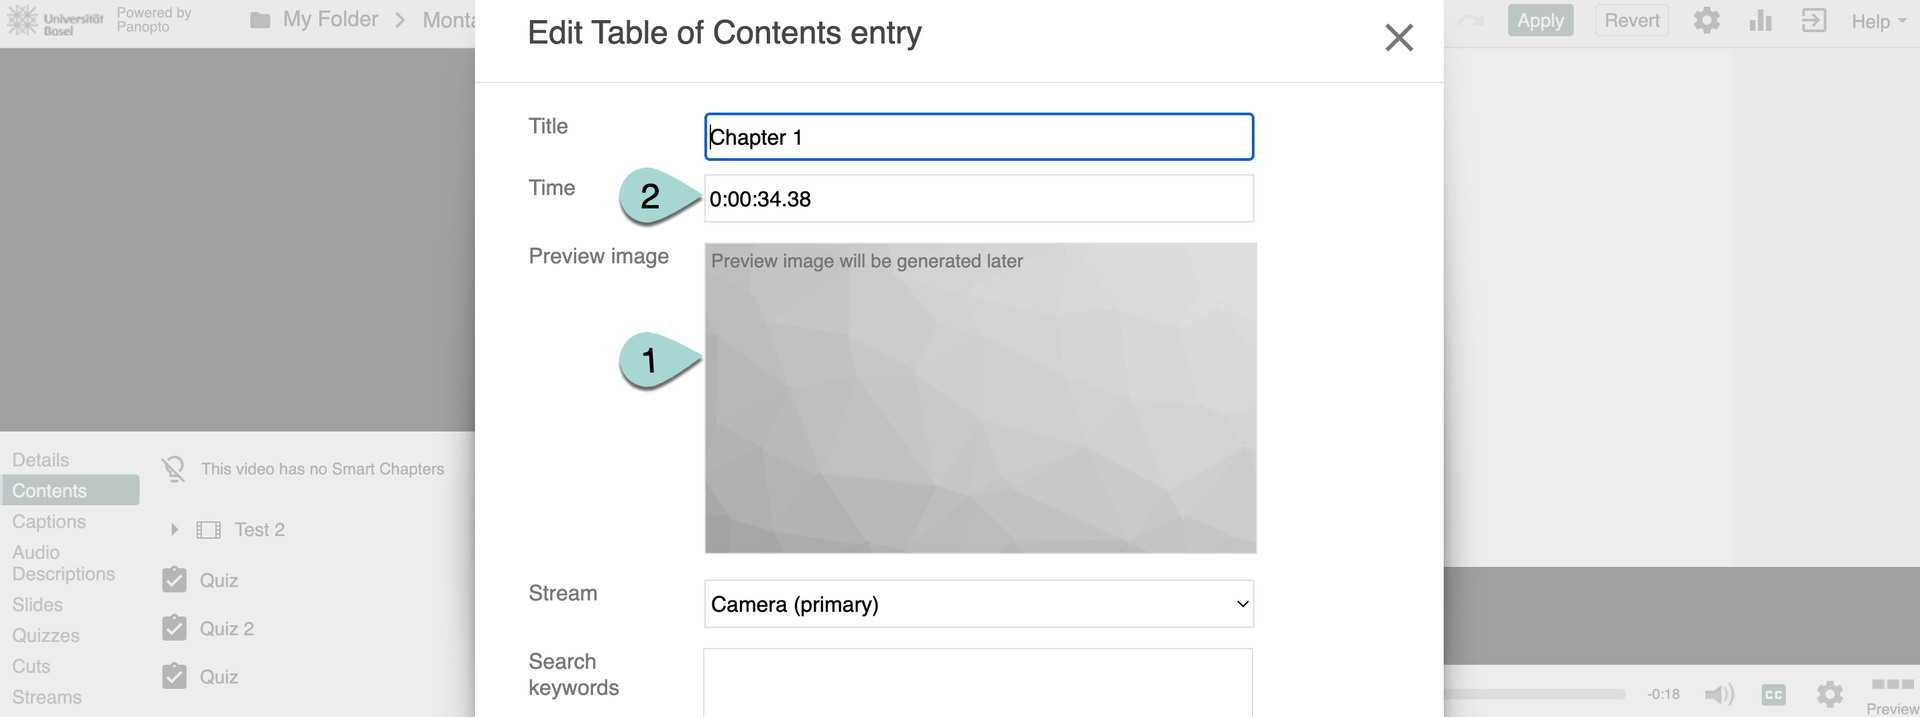
2. Preview image
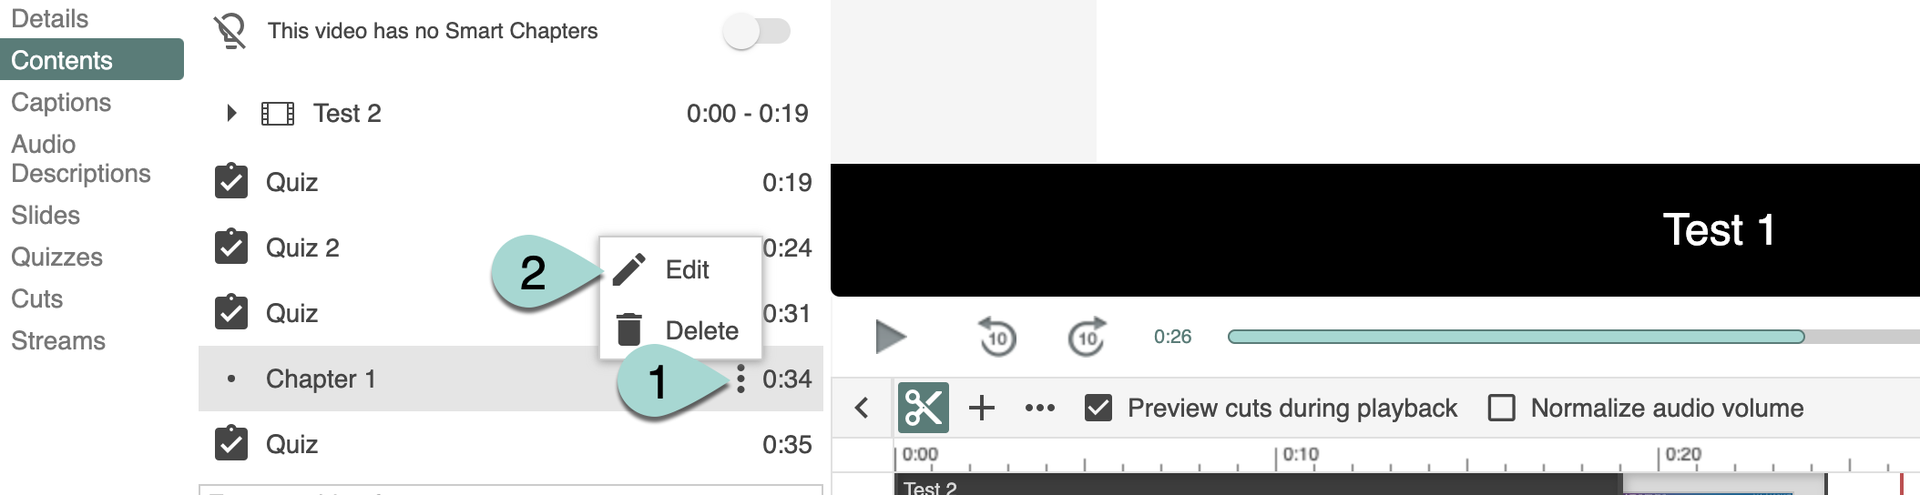
After creating the chapters, you can always edit them afterwards. To do this, click on the three dots (1) and then on edit (2).
In the window that opens, you can see the preview image (1). The still image of the point in time that was specified is automatically taken. You can also edit this point in time (2) here, which would also result in a different preview image. Viewers will see the preview image below the video and can click directly on these images to go to the chapter.
For more detailed information, watch this video:
License
University of Basel